
Google Antigravity IDE - Complete Guide to Vibe Coding
The complete beginner's guide to Google Antigravity IDE. Learn how to install, configure, and use AI-powered vibe coding to build web applications without writing manual code.


Table of Contents
Introduction
Artificial intelligence is changing the way software is built. Instead of manually writing hundreds or thousands of lines of code, developers can now describe what they want in plain English, or in their local languages and let AI generate the application.
This workflow is commonly known as Vibe Coding.
Google Antigravity IDE is designed to make this process much easier by combining AI-powered coding, project management and development tools into a single environment. Whether you’re building a website, mobile app, dashboard, API or automation tool, Antigravity IDE allows you to create projects simply by describing your ideas.
In this guide, you’ll learn everything from installation to building your first AI-powered application without writing code.

What is Google Antigravity IDE?
Google Antigravity IDE is an AI-powered integrated development environment (IDE) that helps developers build applications using natural language instead of traditional programming.
Rather than starting with an empty code editor, you simply explain what you want to build. The AI understands your instructions, generates the required code, edits files, fixes bugs and helps you continue development through conversation.
Instead of focusing on syntax, you focus on ideas.
What is Vibe Coding?
Vibe Coding is a modern software development approach where you communicate with AI using natural language.
Instead of writing code like this:
const button = document.createElement("button");
You simply tell the AI:
“Create a modern login page with email and password fields, Google Sign-In, dark mode support, and responsive design.”
The AI generates everything automatically and at last, you become the designer and decision-maker while AI handles the coding.
Why Use Google Antigravity IDE?
Google Antigravity IDE puts agents right inside the workspace so they can work across the editor, terminal, and browser without you jumping between tools. You describe the task at a higher level. The agent plans it, makes the changes, runs commands, and even opens Chrome to check dashboards, test UI flows, or pull data. It reports back through Artifacts — plans, code diffs, screenshots, browser recordings — so you can review the result instead of chasing every single step. That setup is useful when you are iterating on features or fixing bugs that touch multiple places. Tab gives stronger autocomplete inside the editor, while the side-panel agent stays context-aware of the whole project. Asynchronous agents can run in parallel across workspaces if you need them.
System Requirements Antigravity IDE

Before installing Antigravity IDE, make sure your computer has:
- Windows 10 or Windows 11
- macOS
- Linux
Recommended:
- 8 GB RAM or more
- Stable internet connection
- Google Account
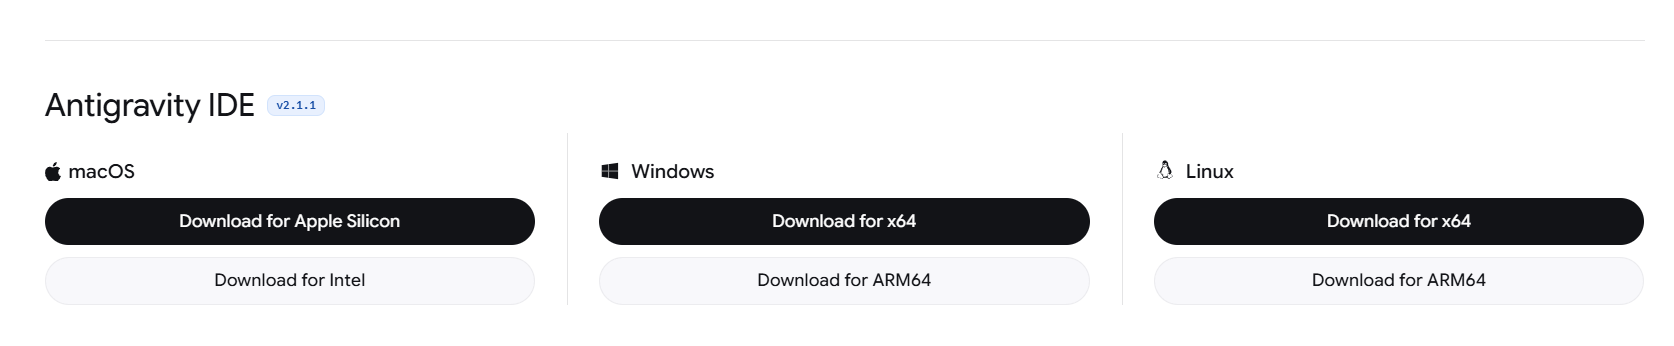
Download Google Antigravity IDE
Visit the official Google Antigravity IDE website.
Choose the version for your operating system.
Download the installer.
Install Antigravity IDE
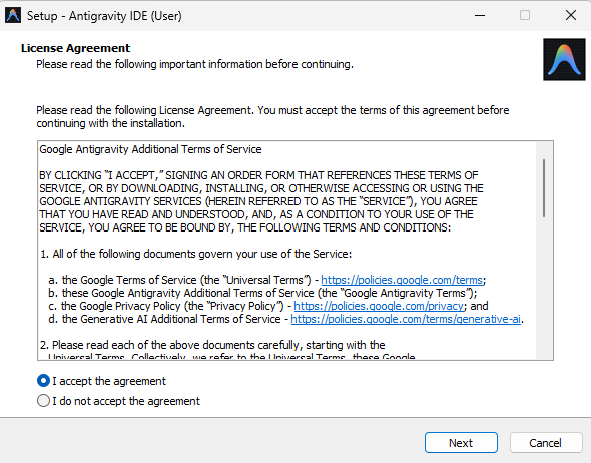
After downloading:
- Run the installer.
- Accept the license agreement.
- Choose an installation folder.
- Click Install.
- Wait for installation to complete.
- Launch Antigravity IDE.
Antigravity IDE Sign In
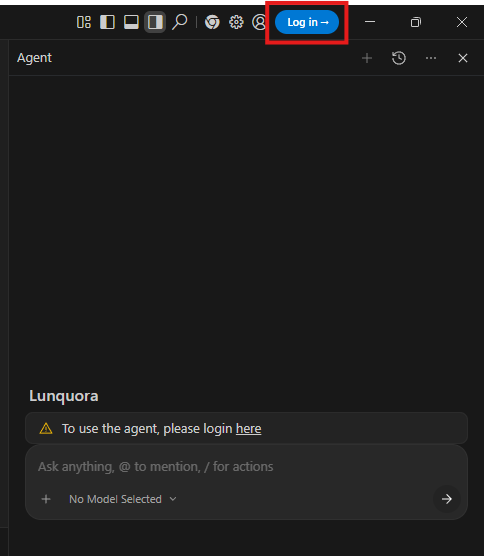
When Antigravity IDE opens for the first time:
- Click on the top right Log in
- Sign in using your Google account.
- Complete the setup process.
- Allow required permissions.
- Finish onboarding.
Create Your First Project In Antigravity IDE
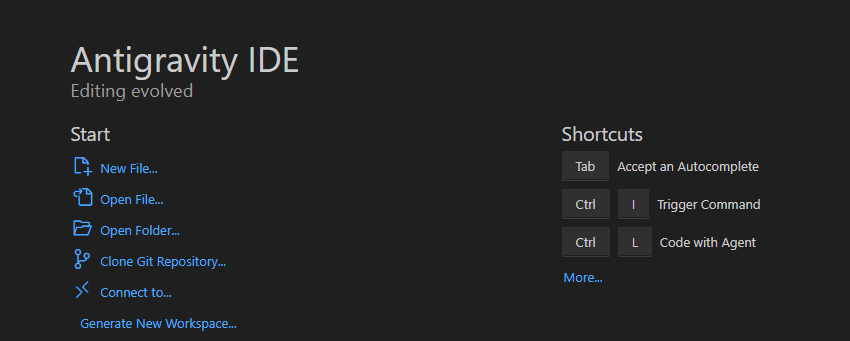
Click: New Workspace, Open Folder or Open your Github Repository
Choose:
- Empty Project Project Folder
- Import Existing Project Folder
- Clone Git Repository
For beginners, select Empty Project or folder.
Give your project or folder a name.
Example:
Sticky Notes App
Click Create.
Understanding the Interface
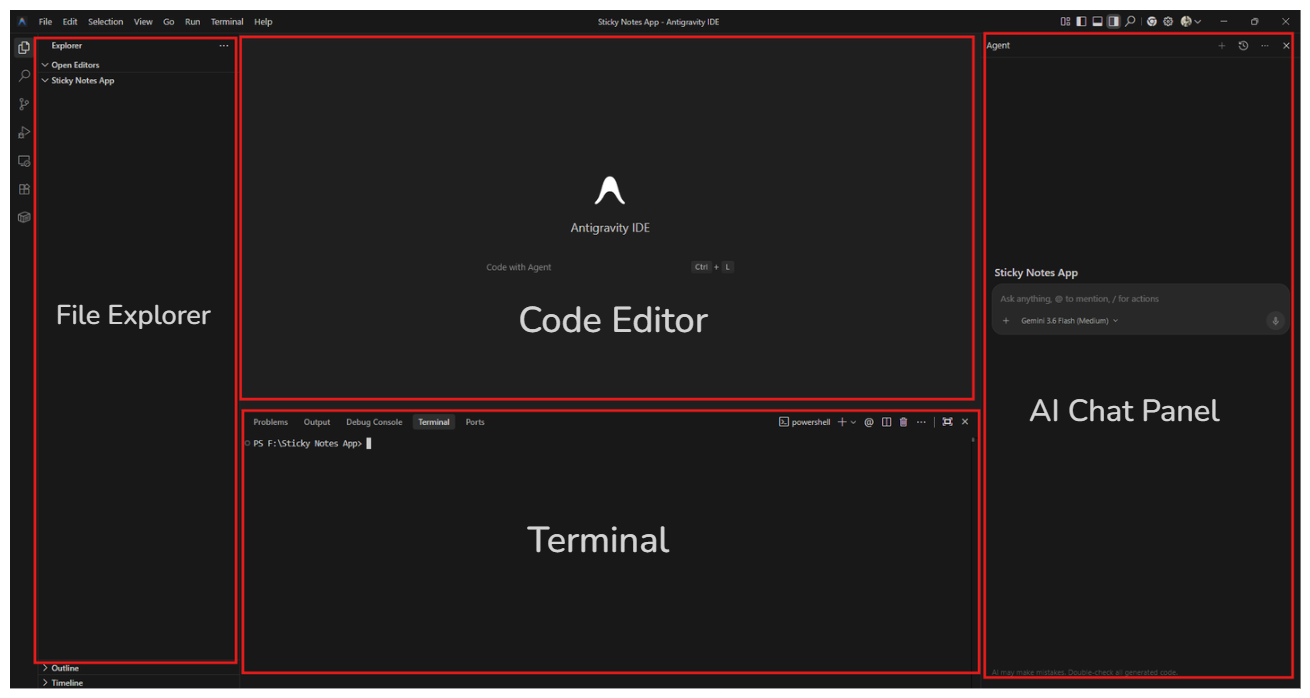
The IDE is divided into several sections.
- AI Chat Panel - This is where you write prompts
- File Explorer - Shows every file in your project.
- Code Editor - Displays generated code.
- Terminal - Runs development commands when needed.
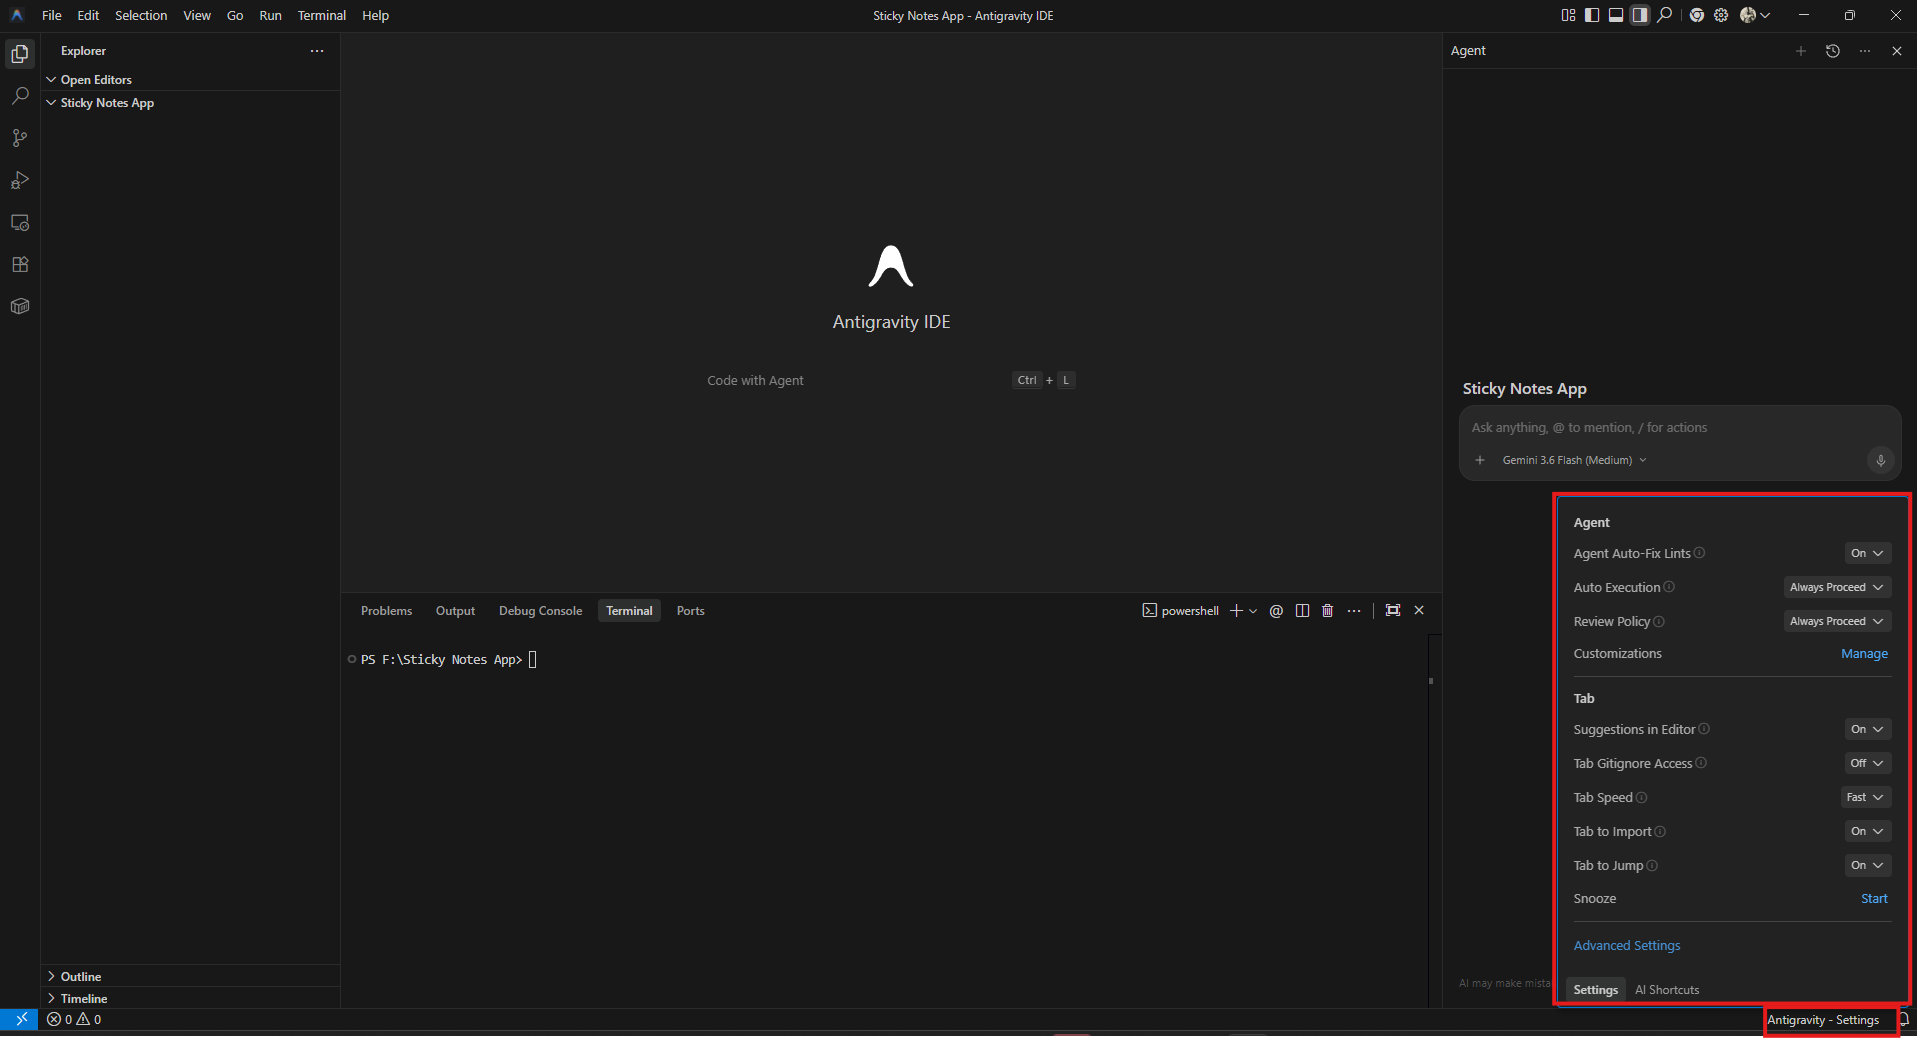
Antigravity IDE Setting
If you click on the bottom right corner “Antigravity - Settings” then a pop-up will open and in this interface you can see most of the settings for the agent.
- Agent Auto-Fix Lints - Automatically fixes linting and code style issues.
- Auto Execution - Controls whether the AI can run commands automatically.
- Review Policy - Determines if AI changes require your approval before applying.
- Suggestions in Editor - Shows AI code suggestions while you type.
- Tab Gitignore Access - Allows the AI to access files listed in .gitignore
- Tab Speed - Controls how quickly AI suggestions appear.
- Tab to Import - Automatically suggests missing imports.
- Tab to Jump - Press Tab to jump to the next editable section or placeholder.
- Snooze - Temporarily pauses AI suggestions.
- Advanced Settings - Provides additional options for AI behavior and preferences.
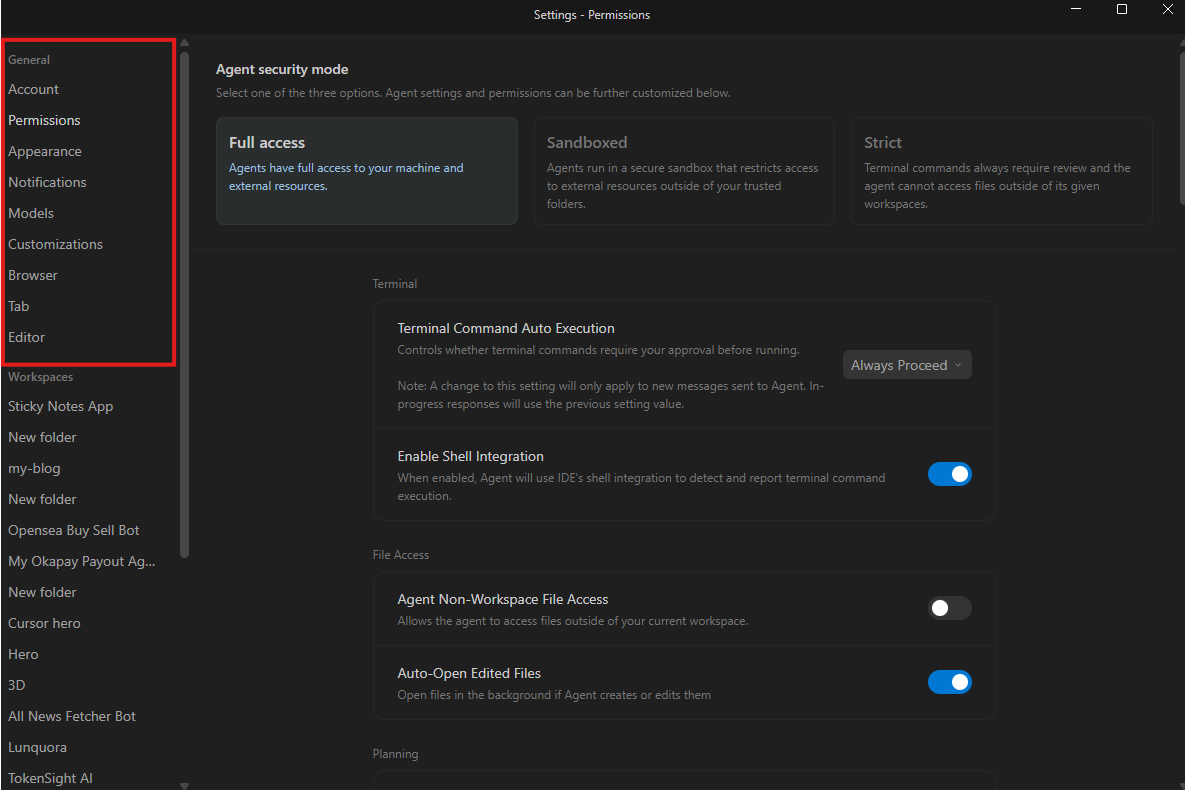
Antigravity IDE Advance Settings
The Settings menu lets you customise how Antigravity IDE works. Below is a quick overview of each category.
- General - Configure basic IDE preferences and startup options.
- Account - Manage your Google account, sign in and sync settings.
- Permissions - Control the AI agent's access to files, terminal commands, and system resources.
- Appearance - Customise the theme, fonts, icons and overall interface.
- Notifications - Manage alerts, updates, and AI notifications.
- Models - Choose the AI model used for coding and assistance.
- Customisations - Configure prompts, agent behaviour and personalisation settings.
- Browser - Manage the built-in browser and web preview preferences.
- Tab - Configure AI tab completion and inline suggestions.
- Editor - Customise the code editor, formatting and editing behaviour.
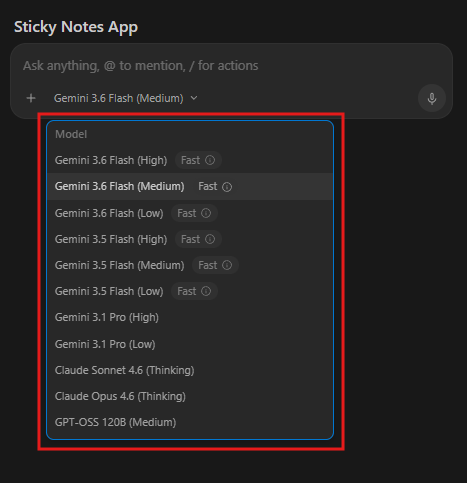
Antigravity IDE AI Model Selector
The AI Model Selector lets you choose which AI model will handle your prompts. Different models offer varying levels of speed, reasoning and coding performance.
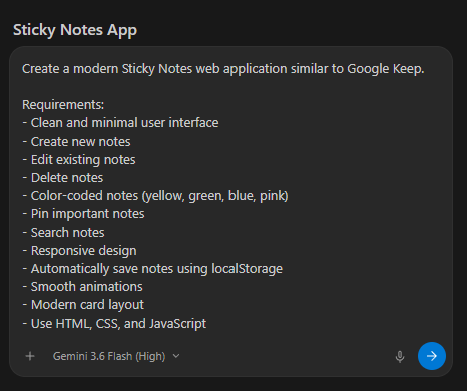
Start With Our First Vibe Coding Prompt
Instead of coding manually simply type:
Create a modern Sticky Notes web application similar to Google Keep.
Requirements:
- Clean and minimal user interface
- Create new notes
- Edit existing notes
- Delete notes
- Color-coded notes (yellow, green, blue, pink)
- Pin important notes
- Search notes
- Responsive design
- Automatically save notes using localStorage
- Smooth animations
- Modern card layout
- Use HTML, CSS, and JavaScript
Click Generate.
The AI will:
- Create folders
- Generate HTML
- Generate CSS
- Generate JavaScript
- Build the layout
- Add responsive design
Antigravity IDE Artifacts
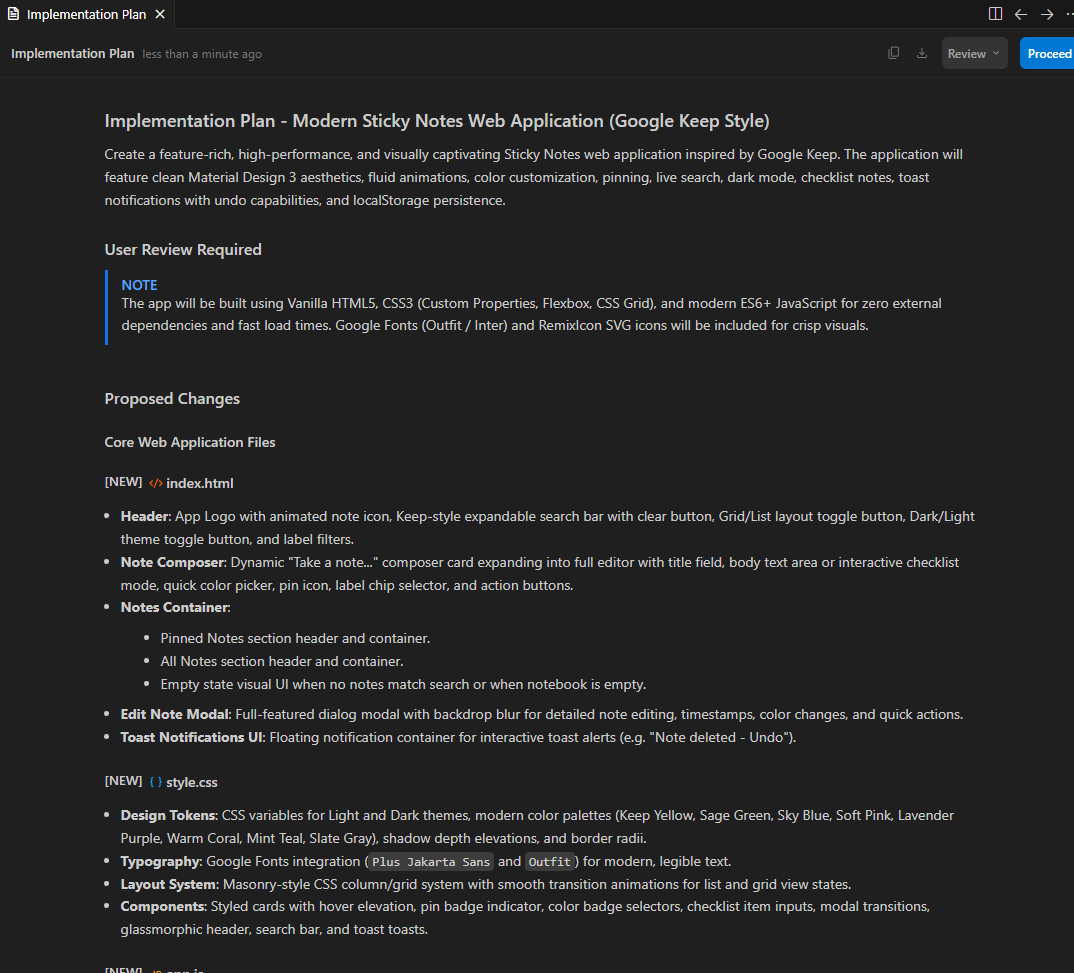
When you start working with the AI Agent, Antigravity IDE automatically creates artifacts to help organise the development process. These artifacts make it easier to plan, build and manage your project without writing code manually. These artifacts work together behind the scenes, allowing the AI to plan, execute, and refine your project more efficiently.
Implement Plan - Creates a step-by-step development plan before generating code. If you think your plan is solid, then click on proceed or want to change something then you can change something in the plan.
E.g - Our Modern Sticky Note web applications plan become ready
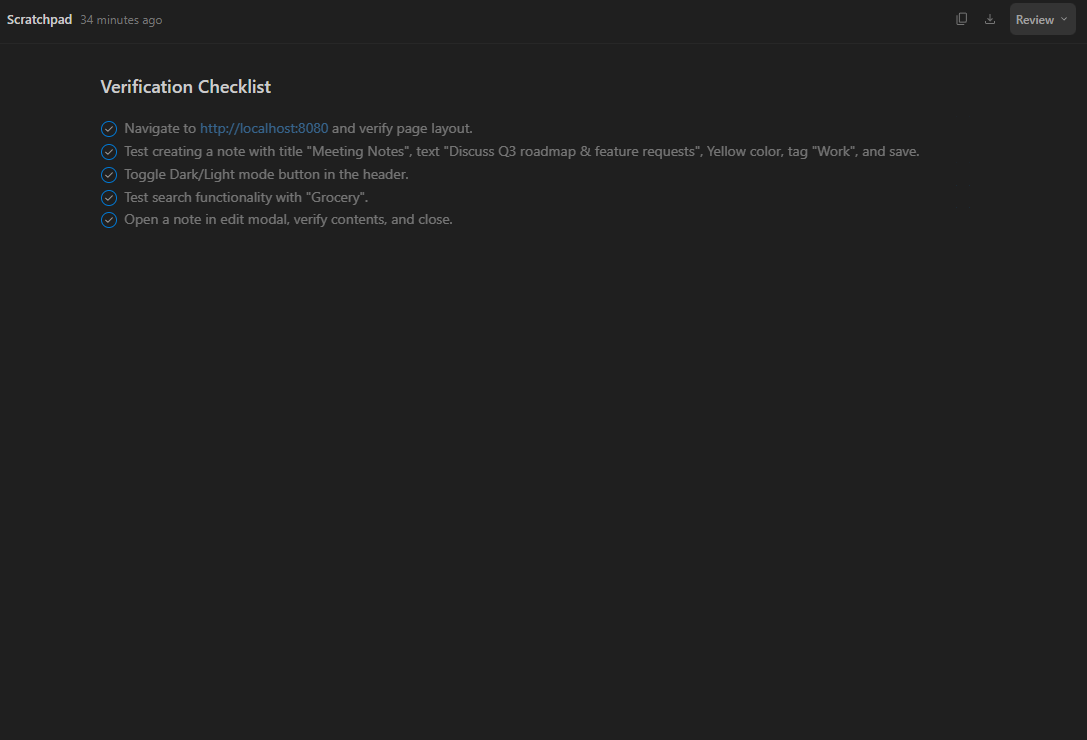
Sketchpad - A temporary workspace where the AI drafts ideas, analyses tasks and prepares solutions before applying changes.
Browser - Opens a built-in browser to preview your application, test features, or view web resources without leaving the IDE. You just need to allow the browser access if you want.
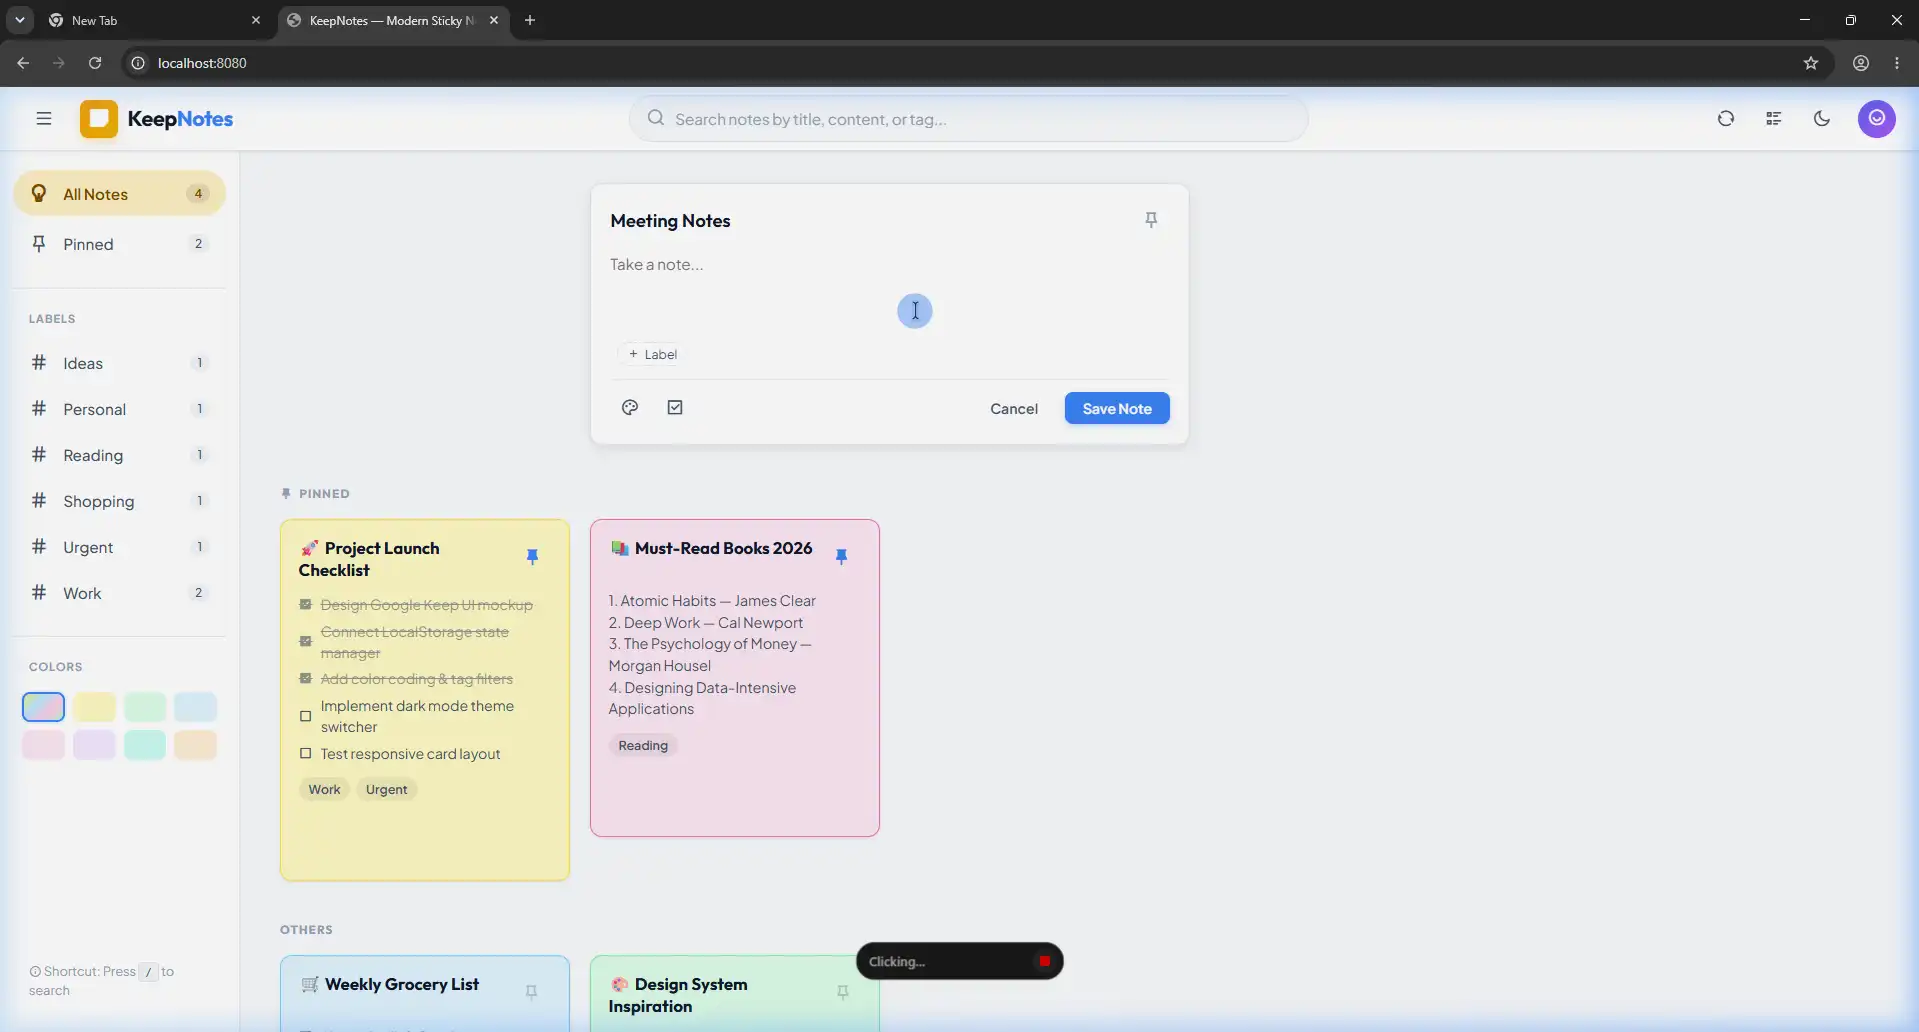
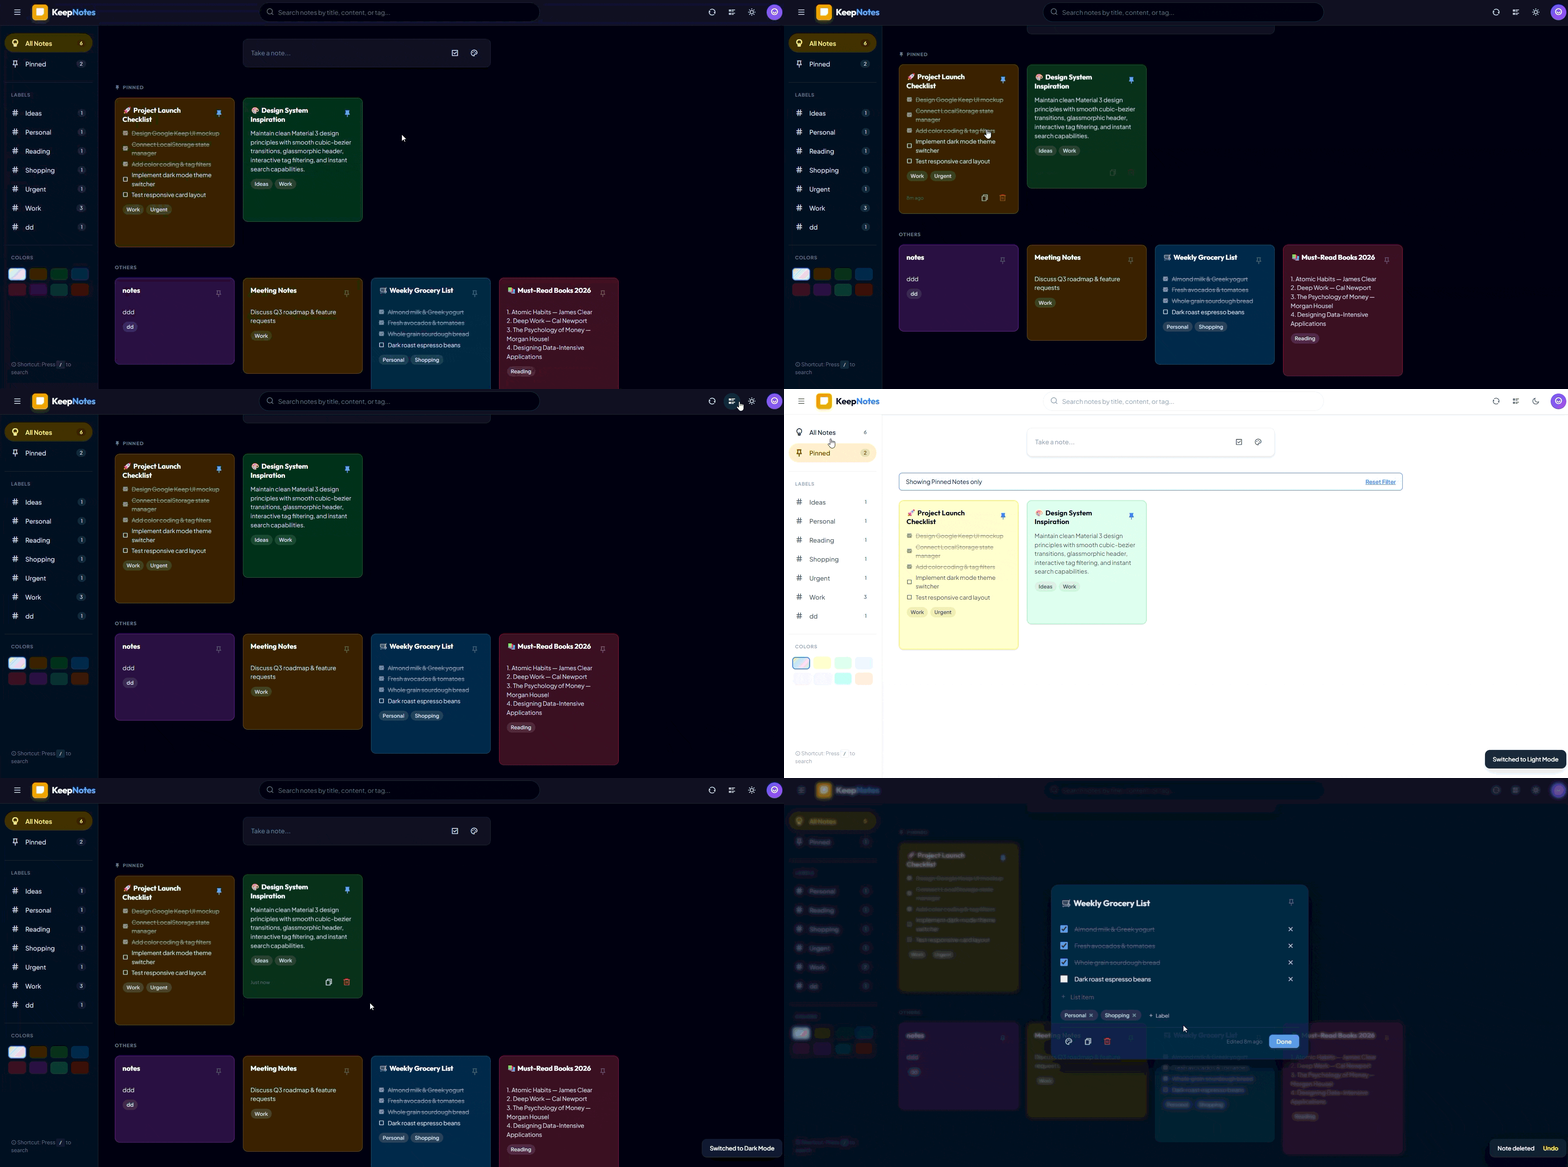
Building our full sticky note App
Our Sticky Notes app is now fully built using Google Antigravity IDE with the power of AI and natural language prompts. We didn't write the application manually instead, the AI generated the complete project, including the user interface, functionality and responsive design. As you can see from the live preview, the app is fully functional and ready to use. This demonstrates how Vibe Coding can significantly speed up development and help turn ideas into working applications with minimal effort.
Fixing Code Errors
If something breaks don’t panic.
Ask - Fix all compilation errors or explain why the project is failing or find performance issues or improve code quality. Also you can use in prompt npm run lint and build with 0 errors. You can take the screenshot of the error and send it directly to the AI chat and the agent will solve it.
Deploying Your Project
Once your application is complete:
- Open the deployment options and hosting platforms (Vercel, Netlify, Cloudflare Pages, Firebase App Hosting, Render, RailwayGitHub Pages, etc).
- Connect your account if needed.
- Build the project.
- Deploy.
After deployment, your application will be accessible through a public URL.
Best Prompting Tips
To get better results:
- Describe your goal clearly.
- Mention colours and design preferences.
- Specify frameworks if needed.
- Request responsive layouts.
- Ask for modern UI.
- Add accessibility requirements.
- Build features step by step.
- Keep prompts focused on one task at a time.
Good prompts produce better applications.
Advantages of Vibe Coding
Vibe coding involves describing what you want in plain language and allowing an AI coding assistant to generate the code. The term was introduced by Andrej Karpathy in 2025 and has become a common way to build prototypes and small applications. You can read Google’s explanation in the Google Cloud guide on vibe coding. One big advantage is speed. Instead of spending time writing boilerplate code, you can explain the feature you need and get a working version within minutes. This works well for landing pages, internal tools, or quick experiments. It also makes learning easier. Beginners can ask the AI why a piece of code works, then edit it and see the result immediately. That feedback loop is often faster than reading documentation alone. Just don’t skip code review. AI-generated code can contain mistakes or security issues, so always test the output before using it in a real project. Google’s guide points out that human review still matters.
Limitations
Although AI can generate impressive applications, you should still review the generated code, test every feature, verify security, optimize performance and understand the application’s architecture. AI is an assistant, not a replacement for good software engineering practices.
Conclusion
Google Antigravity IDE represents a new way of building software. Instead of spending hours writing boilerplate code, developers can focus on solving problems and describing ideas. Through Vibe Coding, even beginners can build websites, dashboards, APIs and full-stack applications by communicating with AI in natural language. As AI development tools continue to improve, learning how to write effective prompts will become just as valuable as learning traditional programming. Also, you can learn more about Antigravity Codelabs and read the Antigravity docs. Mastering Antigravity IDE today can help you build faster, experiment more, and bring ideas to life with far less manual effort than ever before.
Share this publication
Frequently Asked Questions
Is Google Antigravity IDE free to use?
Yes, Google Antigravity IDE offers free access for developers with a standard Google account, giving access to core AI models, workspace creation, and vibe coding capabilities.
Do I need prior coding experience to use Google Antigravity IDE?
No. Antigravity IDE is built specifically for Vibe Coding, allowing you to describe features in plain English or local languages. The AI generates the required code, layout, and fixes errors autonomously.
Which operating systems are supported by Antigravity IDE?
Antigravity IDE runs cross-platform on Windows 10/11, macOS (both Apple Silicon and Intel), and Linux.
How does Antigravity IDE handle code errors and linting?
Antigravity IDE features built-in Agent Auto-Fix Lints and automated terminal diagnostics. If a build fails or runtime error occurs, you can paste the error message or screenshot into the AI chat to let the agent resolve it automatically.
What are Artifacts in Antigravity IDE?
Artifacts are structured helper tools created automatically by the AI agent during development. They include Implementation Plans, Sketchpads for temporary drafts, and an integrated Browser for live previews.
Can I connect Model Context Protocol (MCP) servers in Antigravity IDE?
Yes. Antigravity IDE includes a built-in MCP Store, making it easy to connect custom tools, local databases, and external APIs to expand the AI agent's capabilities.
Can I deploy applications directly from Antigravity IDE?
Yes. Once your project is built, you can deploy your web applications directly to popular hosting platforms like Vercel, Netlify, Cloudflare Pages, Firebase App Hosting, or Render through terminal commands or platform integrations.
Related Publications

Connecting Android Apps to LLMs with MCP Server (2026)
A complete guide to connecting Android applications to Large Language Models using Model Context Protocol (MCP) server workflows in 2026.

Bring Antigravity Multi-Agent AI into Your IDE - Official Extensions Now Available
Google released official Antigravity extensions for VS Code, Visual Studio, JetBrains, and Zed — bringing multi-agent AI orchestration and shared project context directly to your editor.